How To Read Guitar Chords
How to Read Guitar Chords Charts and Diagrams
So you want to learn how to read chord diagrams? Awesome! — making sense of all those lines, dots, and numbers is one of the first skills you'll need to master on your way to guitar greatness. Here's what you'll need to know when you're getting started.

What is a Guitar Chord Chart?
Let's begin by making sense of what you're seeing when you look at a chord diagram. All "dressed up," a chord chart is a visual representation of how any given chord looks when played on the guitar. Strip away all the dots and symbols, though, and you're left with 6 vertical lines and 5 horizontal ones.

That basic diagram is a depiction of a section of the guitar fretboard — the part you'll be using to play the chord.
When looking at a chord chart, imagine you're staring at a guitar from head-on with the headstock pointing upward.
Vertical & Horizontal Lines
Those vertical lines are the strings, with the sixth string being on the far left and the first string on the far right. The horizontal lines show you a series of frets. The thick black line at the top represents the nut of the guitar. If the top line is the same thickness as the others, you're looking at an area further up the guitar neck.
It's on this canvas that we paint the picture of a chord, using a combination of dots, circles, and other symbols.
How to Read Guitar Chords
Now let's add some meaning to all that stuff on top of the lines. At the top of the chord chart, you'll see a symbol (Am, Dm, E, etc.) denoting the chord displayed in the diagram.
Black or Red Dots
On the diagram itself, you'll see varying numbers of black or red dots. These show you where to place your fingers on the fretboard (remember, the vertical lines represent the strings and the space between the horizontal lines depict frets).
You might see numbers within the dots or below the chart. These show which fingers on your fretting hand you should use for the chord.
Finger Numbers
If you're not familiar with finger numbers, here's a quick review:

"1" is your index finger
"2" is your middle finger
"3" is your ring finger
"4" is your pinky
Very rarely, you'll see a "T," which indicates you should fret the string with your thumb. For most chords, though, "1" through "4" are all you need.
X’s and O’s
Moving on, you may have noticed some "X’s" and "O’s" above the string positions on the chart. You'll see these on any strings that you're not fingering. An "X" means you should mute or avoid playing that string. An "O" means you should play the string open (with no fingers touching it).
Bar Chords
And what are bar chords, you might be asking? If you see an arced or thick black line across all six strings, you're dealing with a bar chord. The arced/thick line shows which fret you should place your index finger on. The rest of the symbols will read the same as they would on an open position chord diagram.
How to Read the D Major Guitar Chord
Let's take a look at a few examples, shall we?
First, the D Major chord. You'll notice three dots, located over your first three strings:

String 1: Hold fret "2" using finger "2"
String 2: Hold fret "3" using finger "3"
String 3: Hold fret "2" using finger "1"
The "X’s" over strings 5 and 6 mean you should ignore or mute them, while the "O" over string 4 indicates that you should play it open.
How to Read the F Major Guitar Chord
Now let's see what a bar chord looks like, using F Major chord.
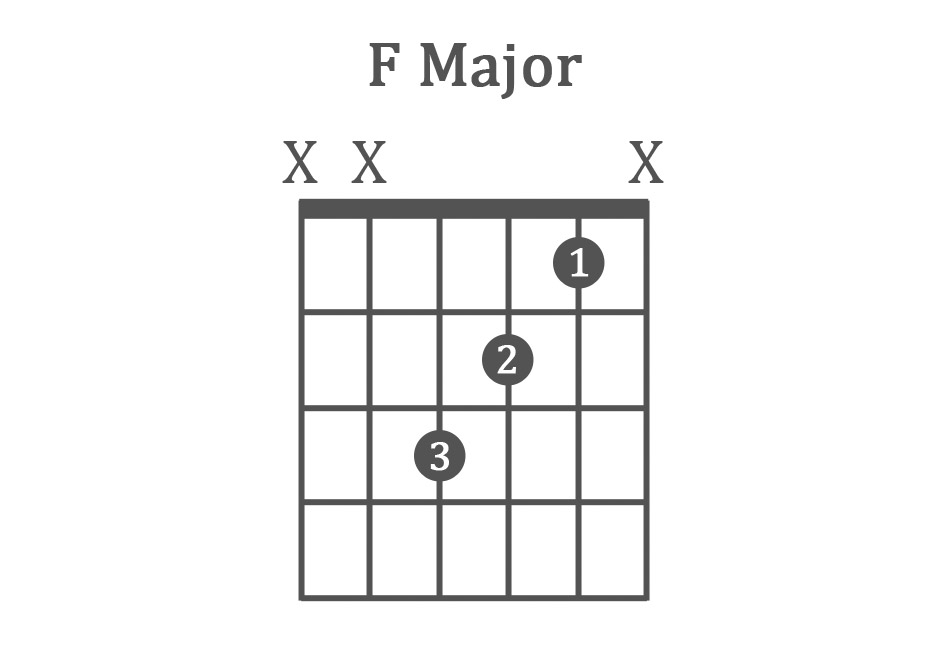
The dots on strings 2, 3, and 4 show where you'll need to put your other fingers to complete the chord:
String 2: Hold fret "1" using finger "1"
String 3: Hold fret "2" using finger "2"
String 4: Hold fret "3" using finger "3"
And there you have it. You should be ready to start tackling your first few chords now.
Remember to take things slow, practice diligently, and have fun as you continue to build your guitar-playing skills.
Bringing It All Together
This might seem like a lot of information to take in at once. Practice will be your key to success. Keep these salient points in mind while working on new chords:
The vertical lines are your strings
The horizontal lines are the fret bars
The dots show where to place your fingers
The numbers represent which fingers to use
"T" means you should play the note with your thumb
"X’s" indicate you should mute (or not play) the string
"O’s" mean you should play the string open