Guitar Fingerpicking Patterns
The 3 Best Guitar Fingerpicking Patterns
Guitar Fingerpicking is a commonly used technique for guitar playing and can be heard in classic hits like "Stairway to Heaven." Unlike strumming with a guitar pick, your finger plucks each string without a guitar pick.
When it comes to fingerpicking your guitar, there exist three essential fingerpicking patterns. Learning each of these patterns is essential because they'll help you acquire the manual dexterity and muscle memory needed to play the many songs that you've been eager to learn.
Need help reading sheet music? Learn How To Read Guitar Sheet Music here.
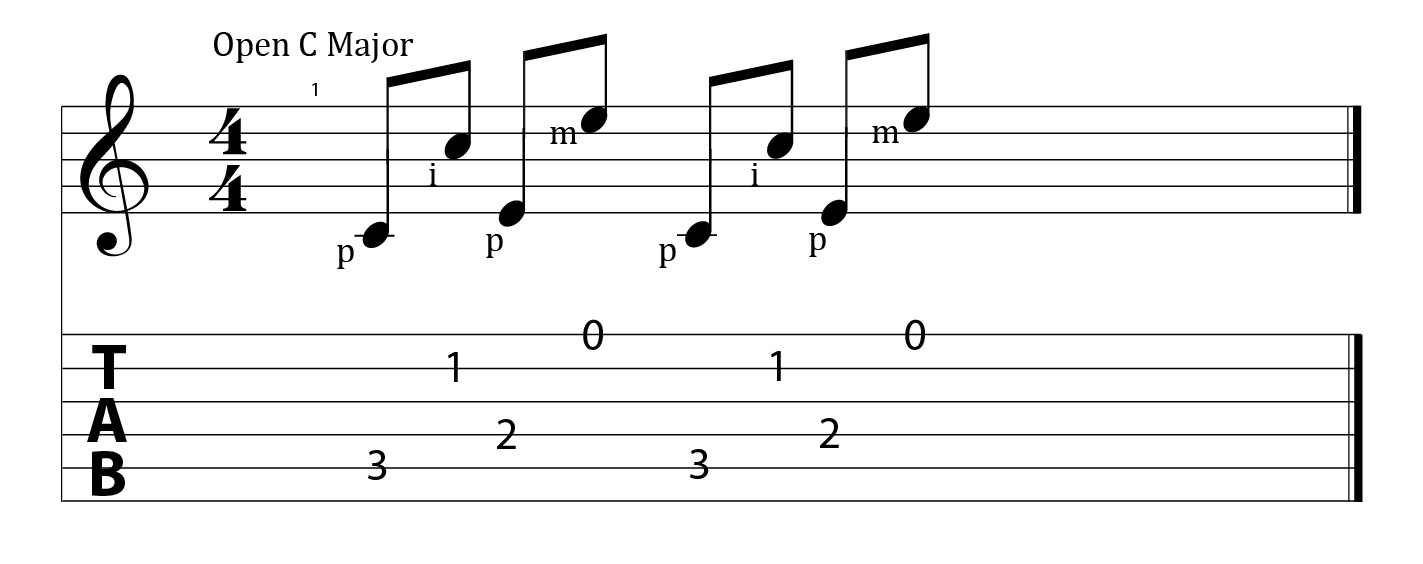
Guitar Fingerpicking Pattern #1: Roll Technique
The first guitar finger pattern starts with a simple roll, which is a technique that can be done up or down. This fingerpicking pattern involves "rolling" your finger across several strings in a smooth manner. It's a cross between fingerpicking each string separately and strumming the strings all at the same time.
Not only do guitar rolls help you develop guitar-playing muscles but they're great to use when playing music with others.
Rolling Up:
Rolling up is the easiest roll pattern to learn. When rolling up, you'll first use your thumb, then your index, middle and ring finger. Until you build up dexterity in your fingers, you'll want to start out slow.

What is PIMA? The letters in PIMA stand for the Spanish words for your fingers. P = pulgar (thumb), I = indice (index finger), M = medio (middle finger), A = anular (ring finger). When the pinky shows up, it is normally labeled with the letter ‘c’ or ‘e’.
Rolling Down:
Rolling down is a little harder to do but uses the same concept as rolling up. Start out a bit slower until you get the hang of it. Use a metronome to help you to keep time and build up speed.

Rolling Up and Down:
Try combining the technique of rolling up and rolling down. Once you get accustomed to rolling, this is how you'll play many tunes. Although you can use the rolling pattern to play any chord, realize that some chords may require the use of different strings.

Guitar Fingerpicking Pattern #2: 4-Step Technique
The second pattern, called the 4-step fingerpicking pattern, is much more difficult to learn than the simple roll. This pattern is named as such because you must make four motions using independent fingers to complete the entire pattern.
Simplified 4-Step:
This technique takes a simplified approach as an introduction to learning the 4-step. Instead of alternating the first three low pitch bass strings (strings 6, 5, 4) with your thumb, you simply pick the first bass string with your thumb and then the other strings with your index, middle and third finger.

Alternating 4-Step:
When you get good at the simplified way to fingerpick, you can try adding another bass string and alternating back and forth using your thumb. In general (but there are exceptions to the rule), you'll typically use your thumb to pick string 6, 5 and 4; then finger 1 (index finger) for string 3; finger 2 (middle finger) for string 2 and finger 3 for string 1. You can then move on to more advanced chord progressions.
Guitar Fingerpicking Pattern #3: Travis Picking Technique
The basic Travis guitar picking pattern is named after Merle Travis, a famous country singer, songwriter and guitar player. To make it easier to understand, we'll break this technique down into four steps.
For the first step in Travis fingerpicking, you simply use your thumb to play all quarter notes.

Travis picking technique step 1 The next step is similar to the alternating 4-step pattern in that you alternate between bass notes using your thumb to pick the A string (5th string) and D string (4th string).

Travis picking technique step 2 Step 3 is performed by mixing in a melody note while you're fingerpicking the alternating bass pattern. For example, to make a C chord simply add in a C note on the B string (2nd string).

Travis picking technique step 3 In this step, you add in even more melody notes along with the alternating bass notes. This step can get a bit complex, so it pays to take your time by going through each note and measure carefully. Over time, you'll build up speed.

Although it'll be slow going in the beginning, continue practicing these techniques and use a metronome until you're able to play at a faster rate.
Whether you use the simple roll, 4-step or Travis picking pattern, you can play any chords. Just remember to make any necessary adjustments to chords that require the use of other guitar strings. Different styles of music use different patterns and chords, so try them all out and experiment to see which you like playing best.