Standing Split
Standing Split: Step-by-Step Instructions
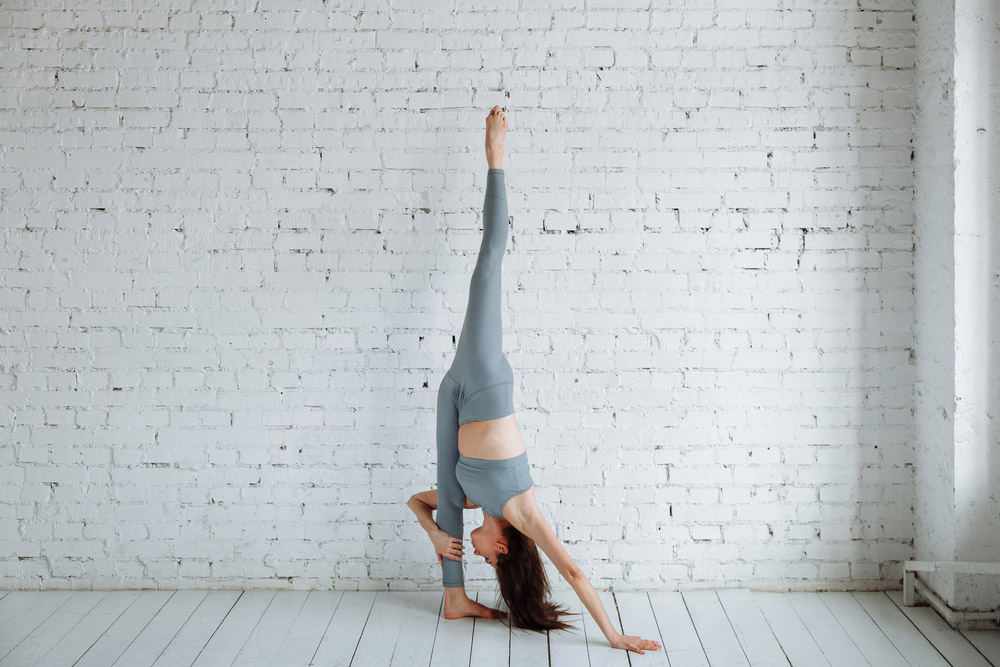
In the Standing Splits Pose, the stretch in your quads and hamstrings matters more than how high you lift your leg behind you. Also known as Urdhva Prasarita Eka Padasana, this pose is excellent for opening your hips and strengthening the legs.
| Aspect | Details |
|---|---|
| Sanskrit Name | Urdhva Prasarita Eka Padasana |
| Pose Level | Level 2 (Intermediate) |
| Primary Focus | Hamstring and quad stretch, hip opening |
| Hold Duration | 30 seconds to 1 minute per side |
| Key Prop | Yoga block (for beginners) |
Urdhva Prasarita Eka Padasana
(Pronounced as "OORD-vah prah-SAH-reetah ache-ah-POD-ahs-anna")
The Sanskrit word urdhva means "high above," prasarita means "stretched out," and eka pada translates to "one foot."
| Sanskrit Term | Translation |
|---|---|
| Urdhva | High above |
| Prasarita | Stretched out |
| Eka Pada | One foot |
How to Do Standing Split
| Step | Key Action |
|---|---|
| 1 | Stand in Tadasana, raise arms overhead, lift left foot to knee level |
| 2 | Prepare to fold forward while swinging the left leg up behind you |
| 3 | Exhale, fold forward, swing left leg high, grab right ankle |
| 4 | Keep both knees straight, point toes, maintain level pelvis |
| 5 | Press right palm into the floor, use it to lift the left leg higher |
| 6 | Keep both legs active, find your balance center on the standing foot |
| 7 | Hold 30 seconds to 1 minute, then repeat on the other side |
Step One
Stand up tall and straight in Tadasana on your yoga mat with your feet together. Inhale as you raise both arms up straight in the air above your head.
Keeping both legs straight, lift your left foot off the floor in front of you and raise it to about knee level. Lengthen your torso up toward the sky as you balance on your right foot.
Step Two
Now prepare yourself to perform the next movements simultaneously. You are going to use the momentum from bending forward to swing your left leg up in the air behind you like the swaying of a pendulum. Engage your right thigh muscles strongly to support you. When you bend forward, reach down with your left hand and aim to grab the back of your right ankle.
Step Three
After taking a big inhalation, exhale fully as you bend forward quickly. Keep looking at the space between your hands as your left foot, torso, arms, and head all move down together.
Swing your left foot up in the air behind you as high as you can. This momentum will help you reach down further to grab the back of your right ankle tightly with your left hand. Place your right hand on the floor beside the outside of your right foot to help yourself balance.
If you are too stiff to grab your ankle and place your right hand on the floor, rest your right hand on a yoga block instead. Then grab the back of your right leg with your left hand after you have reached down as far as you can.
Step Four
Keep both knees straight. Point the toes of your left foot up. Keep your pelvis level without tilting it to either side as you balance. If you have the flexibility, try bending your left elbow and pulling your torso all the way down to touch your right leg.
Step Five
Keep the kneecap of your standing leg facing straight ahead. Press your right palm flat into the floor if you can and use that push to help raise your left leg a little higher behind you in the air.
Step Six
Keep both of your legs equally active to maintain your balance. Shift your weight very slightly between the heel and then the ball of the foot of your standing leg until you find the perfect center of your foot to balance on. Do not collapse the arch of your foot.
Step Seven
Hold for 30 seconds or up to a minute. Exhale as you lower your leg and repeat the pose on the other side for the same duration.
Beginner's Tip:
Stand with a wall behind you and press your lifted foot against the wall for support while you learn to balance.
Pose Information
| Detail | Information |
|---|---|
| Sanskrit Name | Urdhva Prasarita Eka Padasana |
| Pose Level | Level 2 (Intermediate) |
| Primary Muscles | Hamstrings, calves, quadriceps, hip flexors |
| Pose Type | Standing balance, forward fold |
Sanskrit Name:
Urdhva Prasarita Eka Padasana
Pose Level:
Level 2
Contraindications and Cautions:
Severe lower back injuries with inflammation
Recent ankle or knee injuries
Menstruation
During pregnancy: Seek the guidance of an experienced yoga teacher.
Benefits
| Benefit | Description |
|---|---|
| Circulation | Greatly improves blood flow throughout the body |
| Nervous System | Cools and calms the nervous system |
| Flexibility | Stretches tension from hamstrings, calves, and quadriceps |
| Strength and Tone | Tones the legs and hips |
| Balance | Builds proprioception and single-leg stability |
Greatly improves circulation
Cools the nervous system
Stretches tension from the hamstrings, calves, and quadriceps
Tones the legs and hips
Builds balance and proprioception